

One important aspect in landscape photography is the ability to visualise a scene. Some might believe that fairly good photographers were born with such charisma, however, this is not really charisma but something one gains through years of exercise and experience.
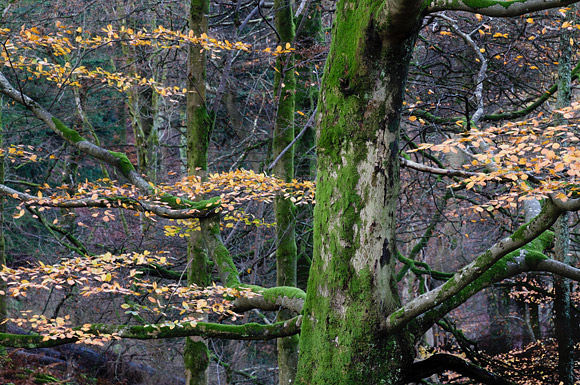
While I was in the Lake District in England running a workshop, on the way back to the vehicle I had to wait for some members of the group to catch up with the rest of us. I noticed this scene in the adjacent field and immediately I thought that there was a picture there. Before I even set up the tripod to capture the picture you see here, I had to visualise the scene and try to figure out if and how it would work. I stared at it, thinking of what I would need to do in post- processing in order to make the leaves and part of the trees to stand out from what seemed to the naked eye to be a chaotic composition. If I captured and developed the scene as I really saw it, I would not have created the picture that you see here today.
First of all I had to make sure I left out of the composition as many distracting branches as possible, providing a clean framing. As I always say, it is much harder to decide what to leave out than what to include. The idea was to include and enhance only the branches with the autumn foliage and at the same time, to make sure that the rest of the scene remained darker.
Instead of trying to explain to you in words what my visualisation was, it is best to describe my processing technique, as after all, this is what would eventually influence my visualisation.
First of all, I captured the RAW file as brightly as I could. I wanted to gather ample data information on those pixels just in case I needed it later. In Lightroom the RAW file looked like this ...
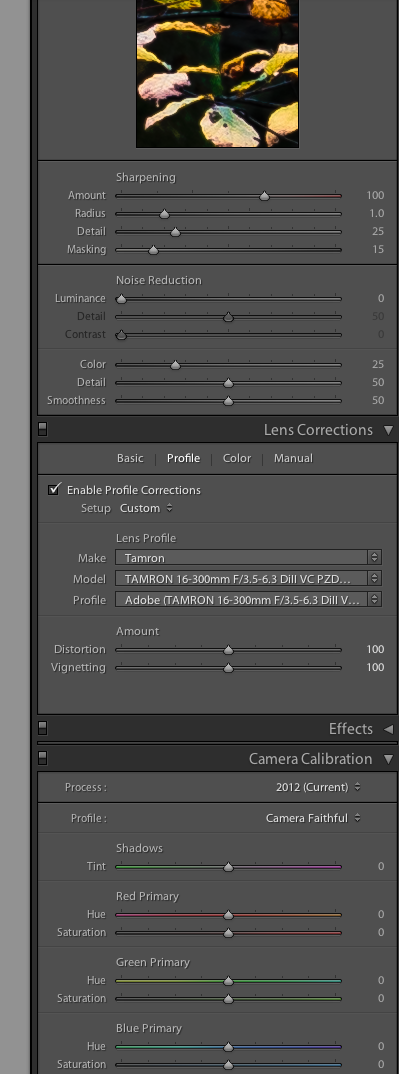 Now, you might find this slightly strange but I always start processing in Lightroom by starting from the bottom of the tools palette and I work myself up. Most of the settings described as ‘preset’ in this article have been added to an action. As soon as a new picture enters Lightroom, those presets are added automatically.
First I started with Camera Calibration set to Camera Faithful (preset) as it is the one that represents true colours on a Canon camera (for me anyway). Then I add lens corrections (preset) – sometimes this is not necessary. Finally I added Amount 100 in sharpening. I always add this amount in Lightroom, it is a very good starting point. I must admit that up to this point the picture still looks dreadful.
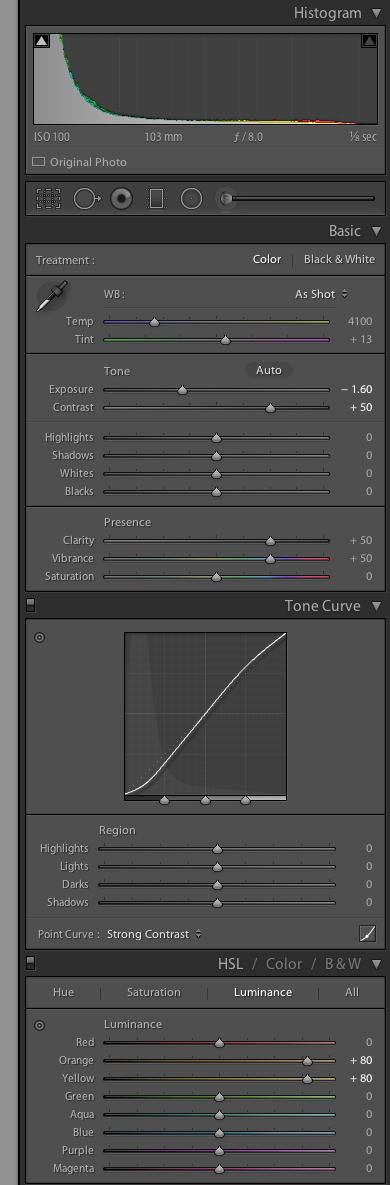 Next I moved to the upper part of the tool palette. I pulled back the exposure by 1.60 – now the picture looked better. The next step was to add contrast +50 and change the Tone Curve to Strong Contrast. The whole scene looked much better but slightly darker overall. Clarity and Vibrance were pushed to +50 (presets) – now the colours looked lovely and vibrant.
However, the entire scene still looked slightly darker and this is exactly how I wanted it. It was now time to work on my real visualisation. The leaves and the central part of the frame, the tree trunk, need to be enhanced.
Autumn leaves are usually orange and yellow in the colour palette. I switched to the Luminance channel and pushed both sliders – +80 made the leaves look brighter and much more enhanced in comparison with the background. It was now time to work on the trunk. I used an adjustment brush to paint on the trunk and then pushed the exposure on it slightly, just enough to make it more visible than the rest of the background.
Visualisation these days does not include only the framing of the scene and the final exposure. It includes processing and final touches, in order to showcase your personal perception of the scene and your inspiration.
10 Comments
Thanks Dimitrios. I used your technique on an image I took about 3-1/2 years ago. It’s a quick edit on my part. Love having another tool in my toolbox.
Posted my before/after to my FB page: https://www.facebook.com/MaryLeeDereskePhotography/
Thank you very much for your kind words, Mary.
Thankyou Dimitrios, an interesting essay as always. I had never thought to start at the bottom of the Lightroom option list but it seems to make sense. My question — how would this post processing be viewed by judges if you entered the image in a competition. Is your processing likely to be viewed as excessive and therefore invalidate the entry or as acceptable because you have not added or removed any physical features? I believe you have judged in the past and it would be nice to get some idea of where a line is typically drawn. I often hold back from competition entry because of this quandary.
Thanks
Raymond
Hello Raymond
Thank you very much for your comment. To be honest, I am not really concerned about judges as I don’t like my images being judged, hence the reason I do not enter competitions. The art of photography is very personal and no one has the right to judge someone else’s images. I do not mind receiving feedback, any kind of it as feedback is not judgement.
I photograph for myself and I capture images that I like. If other people like them also, it’s great, if they don’t, it’s great again. It is impossible to please everyone as the art of photography is extremely personal.
Thanks for the tips. I would love to see a few tips on Landscape tilt shift photography.
I am sorry but tilt & shift is a very complicated subject and no written tips can be useful. On Saturday I am running a photo workshop on tilt & shift lenses, which i find is the best way to learn in detail on how to use such lenses.
It’s refreshing to see more photographers speak honestly about their pre-visualisation including all the way through to post. Thank you for this Dimitri, it has given me some food for thought.
Thank you for reading, Tony.
Very useful, thanks Dimitri.
My pleasure, Peter.